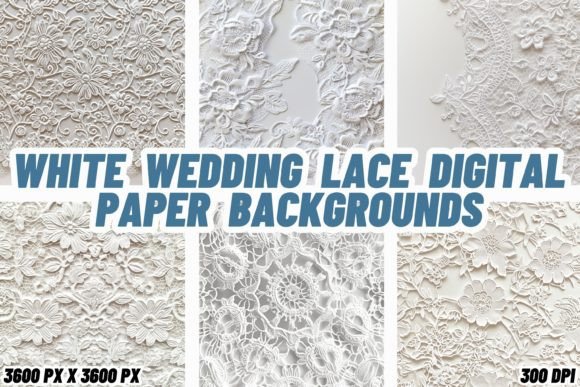
White Wedding Lace Digital Paper: A Practical Guide to Getting It Right
White wedding lace digital paper brings the elegance and romance of lace into your digital projects without the cost or fragility of physical fabric. Whether you’re designing invitations, building a wedding website, creating scrapbook layouts, or crafting branded stationery for clients, this resource offers endless possibilities. But many people—from hobbyists to seasoned professionals—end up frustrated with blurry prints, awkward repeats, or colors that don’t match their vision. The issue isn’t the lace itself; it’s how you choose, evaluate, and use the digital file. Let’s walk through the common pitfalls and, more importantly, how to sidestep them so your work looks polished and intentional.
Understanding White Wedding Lace Digital Paper
Simply put, white wedding lace digital paper is a digital image file that reproduces the look of white lace against a background—often transparent, ivory, or a soft neutral. These files come in formats like JPEG, PNG, or TIFF, and they’re used in design software (Photoshop, Canva, Affinity, etc.) as layers, backgrounds, or textures. The “digital paper” term signals that it behaves like patterned paper in physical scrapbooking but lives entirely in digital form. You can resize, rotate, and layer it without worrying about tearing or staining.
The appeal is obvious: lace adds texture, depth, and a classic bridal feel. But that same intricacy makes it easy to misuse. A pattern that looks gorgeous on screen may turn into a muddy mess when printed, or a seamless tile that appears perfect in preview might show jarring seams once applied. Understanding the technical side of these files is just as important as appreciating their aesthetic.
Common Mistakes When Selecting and Using White Wedding Lace Digital Paper
Most problems stem from a few decisions made early in the process. Let’s look at five frequent errors and how to correct them before they affect your project.
Mistake 1: Overlooking Resolution and Print Requirements
One of the most common disappointments happens when a digital file looks crisp on your monitor but prints out pixelated or blurry. This usually comes down to resolution measured in DPI (dots per inch). For sharing online, 72 DPI is acceptable. For printing—especially on paper where guests will hold the invitation up close—you need at least 300 DPI. Many sellers offer multiple file sizes, and some even label their products as “300 DPI” yet provide a low-quality image scaled down. Always check the pixel dimensions. A file that’s 600x600 pixels at 300 DPI gives you only a 2-inch square—too small for most projects.
Better approach: Before buying, confirm the exact pixel dimensions and DPI. If the product description is vague, download a sample or contact the seller. Test-print a small section on your home printer or send it to a quick proof service. For example, a bride-to-be making her own invitations once purchased a beautiful lace digital paper, only to discover it was 72 DPI; the lace details turned into jagged lines. By spending a few minutes verifying specs upfront, she could have saved time and materials.
Mistake 2: Ignoring the Repeat Pattern or Seamlessness
If you’re using white wedding lace digital paper as a background that covers a larger area—like a full invitation card, a website header, or a printed banner—you need a seamless repeating pattern. A non-seamless file will have visible edges where one tile ends and the next begins. This ruins the illusion of continuous fabric. Even designers sometimes assume any pattern will tile perfectly, but many digital papers are designed as single “portraits” not meant for repetition.
Better approach: Look for the terms “seamless” or “repeatable pattern” in the description. Some sellers provide a tiling preview or a test swatch. If you already have a file that isn’t seamless, you can edit it in software using offset filters and clone tools, but that’s extra work. A graphic designer once used a beautiful lace paper for a wedding website background—the pattern ended abruptly at the browser’s edge, making the site look unfinished. A simple prefab seamless file would have solved it.
Mistake 3: Using the Wrong Color Mode
White lace digital paper typically displays as pure white against a transparent or light background. But “white” is not the same in RGB (screen) and CMYK (print). RGB white is created by maximum red, green, and blue values. CMYK white comes from zero ink on paper—meaning the paper itself provides the white. If you design your invitation in RGB and send it to a commercial printer that expects CMYK, the white lace may pick up a faint tint, or the background may look creamier than intended. This mismatch is especially noticeable on high-quality matte or textured papers.
Better approach: Ask the seller which color mode the file uses. Most digital papers for general use are in RGB because that’s the default for screens, but many also offer CMYK versions for print. If you’re printing the final piece, convert the file to CMYK using your design software and check for color shifts. If possible, get a printed proof before ordering hundreds of copies. A small business owner printing wedding favor tags once saw her pure white lace turn a sickly yellow because she kept it in RGB; a quick conversion and a test print would have caught it.
Mistake 4: Misjudging Scale and Pattern Density
A large, dramatic lace pattern may look stunning on a 12x12 scrapbook page but overwhelming on a 2x3 RSVP card. Conversely, a very fine, delicate lace might get lost on a large poster or backdrop. Many digital papers are shown at a standard preview size, but you might need to scale the pattern up or down. When you enlarge a pattern beyond its intended dimensions, the details become blocky; when you shrink it too much, the lace turns into a muddy texture.
Better approach: Visualize your final project size and compare it to the pattern’s scale. Some sellers include a ruler or a coin in the preview so you can judge the lace’s actual size. Alternatively, download a free sample and place it into a mockup of your project. For instance, a wedding planner making table numbers once used a huge rose-lace pattern on 5x7 cards—the flowers looked distorted. Choosing a medium-scale lace or adjusting the file’s size while preserving proportions would have given a cleaner result.
Mistake 5: Overlooking Licensing and Usage Rights
If you plan to use white wedding lace digital paper in any commercial capacity—selling printed invitations, designing templates, creating merchandise, or even using it for clients’ projects—you must ensure the license allows that. Many digital papers come with a “personal use only” restriction. Using them for profit without proper licensing could lead to a takedown notice or worse. This is especially relevant for small business owners and freelancers who download freebies or purchase cheap bundles without reading terms.
Better approach: Before buying, find the license information. Look for clear wording: “commercial use allowed,” “extended license,” or “unlimited projects.” If the license is vague, ask the seller. Some creators explicitly allow use in printed goods but not in digital templates or stock resources. For example, a local stationer printed hundreds of wedding programs using a royalty-free lace paper she later discovered was for personal use only—she had to redesign everything and lost two weekends of work. Spending twenty minutes reading the license could have prevented that.
How to Evaluate White Wedding Lace Digital Paper Before Buying
Rather than jumping at a beautiful thumbnail, develop a quick checklist. First, confirm the resolution: at least 300 DPI and appropriate pixel dimensions for your project. Second, check if it is seamless if you need tiling. Third, verify the color mode fits your output. Fourth, look at the pattern scale relative to your intended use—some sellers provide scale guides. Fifth, read the license terms for any commercial use. Many reputable shops also offer a small preview download so you can place the paper into your own design software and see how it behaves with your chosen fonts, embellishments, and text. This mini test often reveals issues like transparency problems or unexpected background colors.
Also pay attention to file format: PNG with transparency is best for overlays, while JPEG works well for full backgrounds. If you need to isolate the lace from its background, a PNG with a clean alpha channel saves time. Some files come as layered PSD or TIFF, which might be overkill for simple projects but useful for professionals who want full control.
Practical Advice for Applying White Wedding Lace Digital Paper
Once you’ve chosen a high-quality file, the application is straightforward but worth a few tips. Use clipping masks or layer masks in your design software to confine the lace to specific shapes—like a heart on a cover, or a rectangular panel behind text. This prevents the pattern from overpowering every element. Adjust the opacity to make the lace feel more like a soft texture than a graphic pattern; a 40–60% opacity often works beautifully. Combine the lace with solid blocks of color (muted blush, gold, silver) to create contrast and keep the design balanced. And consider adding a subtle drop shadow or inner shadow to mimic the dimensional effect of real lace. Test different blending modes (multiply, overlay) to see which best preserves the delicate details.
If you’re printing, always do a small test run on the actual paper stock you plan to use. Different papers absorb ink differently, and lacy patterns accentuate any bleeding or sharpness loss. A laser printer may render fine details differently than an inkjet, so tweak your print settings accordingly—choose a “high quality” or “photo” preset.
Final Thoughts
White wedding lace digital paper can elevate your projects from basic to beautiful, but only when you select the right file and apply it correctly. The most common frustrations—pixelated prints, awkward seams, color mismatches, wrong scale, legal issues—are all avoidable with a bit of upfront research. Approach each purchase as an investment in your time and final product. Ask the right questions, test before you commit, and keep the practical considerations in mind alongside the aesthetic appeal. Whether you’re a bride crafting your own invitations, a designer building a cohesive wedding suite, or a business owner creating marketable stationery, a deliberate approach will save you headaches and produce results you’re genuinely proud to share.